
How to Install Solar Panel Mounting Brackets on Flat Roofs with Flashing?
We have undertaken numerous solar panel mounting brackets on flat roofs, the most common type of rooftop renewable energy. Each installation on a different roof type involves connecting the solar panel mounts to the roof membrane and aligning them with existing membrane seams, using specialized tools, sealants, and materials from the solar panel kit to ensure a reliable, weatherproof installation in the harshest conditions.
Site Assessment and Planning for Solar Panel Mounting Brackets
Before touching any roofing materials, I conduct a comprehensive site assessment at the beginning of each project. First, the installer walks the roof to identify low spots where water may accumulate and uses a digital inclinometer to check the slope and membrane condition; then, the PV array layout is drawn and the CAD overlay is exported to a tablet to ensure that each row of solar panel mounting brackets is aligned with the roof seams and underlying structural supports. Existing roof penetrations, vents, HVAC outlets, and skylights are also located to avoid interfering with the placement of the mounts.
Next, technicians use a laser measurement tool to mark mount locations within ±1 cm accuracy and verify clearances from walls and equipment. Our installers will calculate wind and snow load requirements according to local building codes and adjust bracket spacing, ballast, or direct connection methods accordingly. Install each bracket securely on a solid, dry surface.

Select the type of solar panel mounting bracket and the waterproof material you prefer.
Suitable hardware can bring a lasting installation. I often use adjustable stainless steel solar panel mounting brackets, which are ideal for coastal wind areas and high snow loads. At the same time, the system pairs EPDM-lined waterproofing kits with roof membranes to achieve uniform, chemically compatible bonding. Before formal installation, we will evaluate the bracket foot design of each solar panel kit, using bolt-on connections in high-wind areas or non-penetrating ballast solutions to prevent roof warranty-prohibited penetration. Additionally, we will pre-cut and thermoform the flashing to match the installation location of each bracket, thereby reducing on-site manufacturing time and waste by ensuring a precise match between the bracket and flashing materials. Proper installation ensures a seamless, durable seal between the bracket and roof surface, extending the solar panel’s service life.
Roof Preparation and Membrane Protection
Once the materials are selected, we clean the membrane around each marked location using 100% isopropyl alcohol and a lint-free cloth to remove oil, dirt, and oxides. Afterwards, I remove loose debris with a soft-bristle brush and verify that the membrane has no punctures or seam separations. In addition, I apply a membrane-approved primer to each area to enhance the adhesion of the flashing tape or liquid flashing membrane. In high-traffic areas, I install silicone-coated sidewalk mats to prevent wear on the roof and reduce the risk of slips while working. Additionally, workers set up temporary sunshades as needed to prevent the sealant from curing too quickly in direct sunlight. By protecting the membrane and ensuring that the substrate is clean and primed, I lay the foundation for a strong, leak-proof flashing bond that will withstand years of thermal cycling and structural movement.
Install Flashing and Baseboards
Installing flashing underneath each solar panel mounting bracket is key to a flashing design. At this stage, I carefully place the prefabricated flashing over the primed area, smoothing out bubbles and wrinkles with a weighted roller; I then glue or weld the flashing edges according to the membrane system’s specifications, using heat welding for TPO/PVC and industrial adhesives for EPDM. We also use stainless steel spacer fasteners to secure the bracket base through the flashing, ensuring a snug fit without over-torquing and deforming the membrane. Each fastener head is then back-sealed with a compatible butyl sealant to prevent capillary wicking. For some of the windier South American locations, I also apply a continuous coat of polyurethane sealant around the perimeter of the base for added redundancy. This creates a solid, impermeable barrier that protects the roof under the solar panels from moisture penetration and mechanical wear.
Securing the panels and adjusting the tilt
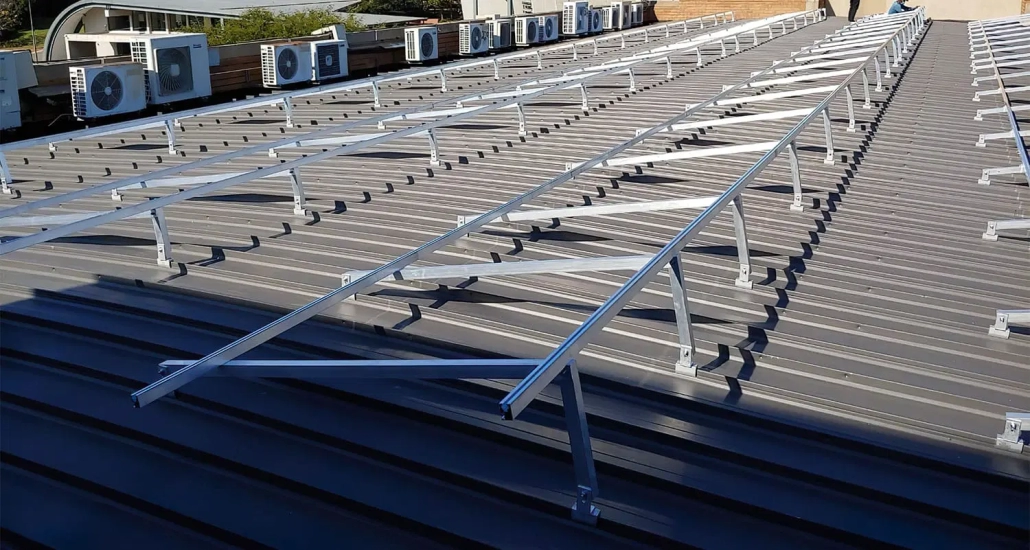
Once all bracket bases and flashings are in place, the rails and panel fixings begin. Installers snap the extruded aluminum rails into the bracket clamps and use a box level with a laser line to align them vertically. Then, they secure non-slip end stop clips and mid-span fasteners to block rail movement under wind loads. We install each solar panel using factory-supplied torque-controlled stainless steel clamps and neoprene washers to minimize micro-vibration and precisely achieve the specified clamping torque. Next, technicians adjust each bracket’s tilt angle using built-in slots and calibrated protractors, typically setting it between 10° and 15° for maximum annual energy output. Finally, I recheck all fasteners to ensure consistency and compliance with structural calculations and local building codes.
Final Inspection and Maintenance Tips for Solar Panel Mounting Brackets
After completing all installations, I will inspect each solar panel mounting bracket and flashing detail comprehensively to confirm their integrity. Finally, I will perform a water immersion test, gently spraying water on the panel array with a calibrated nozzle and monitoring the flashing interface for any signs of leakage. I will also verify the torque of all bolts and confirm the straightness of the track using multiple data points from laser line scanning.
At the same time, our installers will prepare a detailed handover report, including high-resolution photos and torque logs of each flashing. They will then guide customers through routine maintenance tasks, such as cleaning debris around the bracket base, conducting annual sealant inspections, and recording thermal anomalies through infrared scanning. By combining a meticulous final inspection with clear maintenance instructions, we ensure that every flat roof solar installation can withstand the test of various factors.
Careful and reliable completion of each installation
Before each installation, we assess the roof condition, select compatible brackets and waterproof membranes, prepare and apply the baseboard, and install and seal each baseboard with mechanical fasteners and high-performance sealants. We also install and align rails and modules, and perform a comprehensive final inspection. To ensure the flat roof solar array is durable, leak-free, improves power generation, and minimizes maintenance.


